
Kitchen Banquette Planning: How to Build a Breakfast Nook You’ll Actually Use
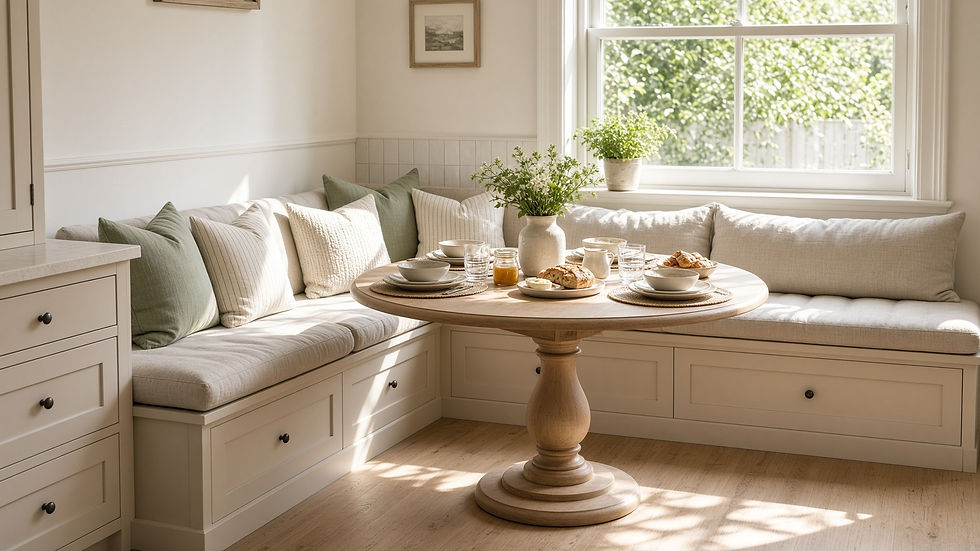
If you’ve ever pushed chairs in and out of a tight kitchen corner three times before breakfast is even plated, you already know the problem. A freestanding table needs pull-out space on every side. A built-in banquette doesn’t. One or two sides sit against the wall, the table tucks closer to the corner, and you suddenly have a daily seat that also hides backpacks, placemats, or kids’ art supplies underneath.
We’re seeing banquettes show up more often in 2026 kitchen renovations—not as a showpiece, as a practical built-in. Houzz’s recent kitchen trends work still lists built-in seating (including banquettes) among the specialty features homeowners add when they renovate. That tracks with what you notice walking through Illinois ranch and custom kitchens: the nook by the window or the short wall off the island often becomes the most-used spot in the house if the dimensions are right.
Here’s how to plan one so it feels comfortable on day one—and still works five years later.

Start with the seat, not the pretty elevation
Custom cabinetry looks great in a photo. A bad seat height ruins every meal. Lock these numbers before you talk finishes:
- Finished seat height: about 18 inches from the floor to the top of the compressed cushion. Build the plywood deck lower (often around 16 inches) so the foam compresses into that 18-inch target. If you build an 18-inch box and then add thick foam on top, you’ll sit too high for a standard table.
- Usable seat depth: roughly 18–22 inches including the cushion. Deeper than that and most people slide forward unless you add a cushioned back.
- Back angle: a slight tilt (about 5–10 degrees) is more comfortable than a flat cabinet panel against the wall. Straight backs are easier to build; angled backs feel better for longer sits.
- Bench length: plan about 24 inches of clear length per adult as a minimum, closer to 30 inches if you want relaxed seating. On an L-shaped banquette, don’t count the inside corner as a full second seat—two adults rarely fit there comfortably.
Pair that bench with a table about 28–30 inches tall. You want roughly 10–12 inches from the seat edge to the table edge so plates stay in reach without pinching your torso. A pedestal or trestle base is usually kinder than four corner legs, which steal knee room exactly where the second person on each bench needs it.
Tape the footprint on the floor with painter’s tape and sit in a dining chair against it for a few minutes. If the mock-up feels cramped now, the finished millwork will feel worse.

Pick a layout that matches how you move
Three shapes cover almost every kitchen:
Straight bench. Simplest to build, easiest to clean, and best when you only have one free wall. Put chairs on the open side so people can get in and out without climbing over each other.
L-shaped corner. The classic breakfast nook. It seats more people in less floor area because you don’t need chair clearance on the wall sides. Leave one open end so the person in the middle isn’t trapped. Great against a window wall in a ranch kitchen where you want morning light.
U-shaped or bay nook. Maximum seating for a wide bay, but plan an easy exit. A table that slides a few inches on felt pads (or a lightweight pedestal table) saves a lot of frustration.
Watch the walkway behind any open seating. About 36 inches is a workable minimum to edge past; closer to 42 inches feels comfortable for daily traffic. If the banquette backs up to the main kitchen aisle, protect that aisle first—don’t steal circulation to gain one extra cushion.
Also note windows, baseboard heaters, and floor vents before you sketch storage. Enclosing a heat source without a plan is a classic remodel regret.

Build in storage you’ll actually open
Under-bench storage is half the reason to go built-in. Drawers or pull-out bins beat lift-up lids once cushions and people are in the way. Use the deep corner for seasonal or rarely needed items. Keep daily stuff—placemats, napkins, charging cables, homework folders—in the sections you can reach without moving the table.
A few finish details that hold up in real kitchens:
- Removable, washable cushion covers (performance fabric or indoor-outdoor textile) beat delicate upholstery.
- A recessed toe kick makes sitting more comfortable and keeps the banquette from looking like a solid box.
- Match the banquette face to nearby cabinets if you want it to read as millwork. Or paint it a soft contrast color if you want the nook to feel like its own little room—still keep wood tone or metal hardware echoing something else in the kitchen so it doesn’t look bolted on.
If you’re in new construction, ask the builder early where the banquette will land relative to outlets and switches. It’s easier to drop an outlet inside a drawer bay for charging than to fish wire later.

Expensive custom vs. a weekend-friendly version
Full custom banquette (cabinet shop or finish carpenter, built to the walls, soft-close drawers, upholstered backs) is the polished path. It’s also the spend. Worth it when the nook is oddly shaped, sits under a bay window, or needs to match high-end kitchen cabinetry.
Lower-cost versions that still work hard:
1. Semi-custom or stock base cabinets in a run, topped with a plywood seat deck, trim, and cushions. You’re buying cabinet boxes you can get drawers for, then finishing the top yourself.
2. A freestanding storage bench or two against the wall, plus a pedestal table and two chairs on the open side. Not a true built-in, but you get the seating density and some storage without cutting into walls.
3. DIY plywood box with a hinged top only if you’re honest about access. Lift lids look clean; drawers get used more. If you DIY, still hit that 18-inch finished seat height.
Phasing is fine. Put the table and a temporary bench in place for a season so you confirm the size, then upgrade to millwork once you know the family actually eats there.
What to try first this weekend
Walk your kitchen with a tape measure and answer three questions out loud:
1. Which wall or corner already collects the breakfast clutter?
2. Can you keep at least 36 inches of walkway if a bench goes on that wall?
3. Do you want drawers (daily access) or a simpler lid (cheaper, less convenient)?
Sketch an L or a straight run, mark seat height at 18 inches finished, and decide whether this is a builder/designer conversation or a cabinet-based DIY. If you’re remodeling anyway, get the banquette on the same finish schedule as the perimeter cabinets so stains and paint sheens match. If you’re not remodeling yet, a solid freestanding bench and the right table still solve the “chairs everywhere” problem until you’re ready for millwork.
A good banquette doesn’t shout. It just becomes the place everyone sits first—coffee, homework, a quick dinner—because it finally fits the way you live.


Comments